
I am not really that useful as a gunsmith. I have a son who has built several Ar-15s, including a really nice one for for me. I looked into building a AK and the tools you need for that are more expensive then buying a new AK. So I looked into Uzi’s. Semi Automatic versions of Uzl’s are readily available and I decided that I needed to build one. So I went out and bought a Semi-Automatically, Fully Welded receiver and a parts kit. I will be documenting the steps required to built this over the next two weeks. I would like to state for the record that US built Semi Automatic parts are being used. The barrel size is 16 inches, which makes it legal without any SBR permit. I am also using an Uzi Stickgrip modified to be only semi-automatic. It will use a semi-automatic sear and have the required number of US built parts. It is completely legal in the state that I live in. I live a FREE STATE. I bought the Uzi receiver from a Federally Licensed Dealer (FFL) and I passed the Federal Background check before I was allowed to take the receiver home. The only restricted part according to the ATF is the receiver. All the other parts could be shipped directly to my home.
The first step is to get all the parts for the build.
I should put a disclaimer here to look into the laws in the state where you live to see if you are allowed to have a semi automatic UZI. Or what changes you might need to make it legal.
I live in a free state. I can have anything, including a real uzi if I fill out the Federal Class 3 paperwork, pay $200 and wait 8-9 months for the tax stamp to come back. For a semi-automatic rifle in my state, I don’t even need a permit to buy one or build one.
I will including the parts in my build. There are many sources for parts kits and barrels and magazines. There’s only one source that I know of for the fully welded and ready to go, uzi receiver, and that’s McKay enterprises. You will need to have McKay send the Uzi receiver to a local FFL (Federal Firearms License) holder. You will do the federaal background check before they let you bring home the receiver. To the ATF, the receiver is the gun. All the other parts can be sent directly to your house.
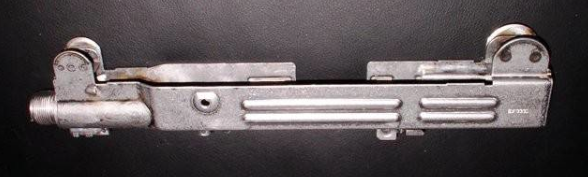
McKay Uzi Semi Auto fully welded receiver

McKay UZI type semi-auto bolt assembly. This receiver uses most of the Full auto parts like the stick grip, and top cover.

IMI UZI Completion Kit for McKay designed for use with these products. You get just what you need to complete the McKay Parts above.

Add a barrel. I used a NH company. Green Mountain Barrels.

![]()
Add a semi-auto sear to replace the one in the full auto kit ($27 or you can modify the full auto one) and a Uzi magazine from D and D sales.
Now that’s everything you need to build a semi-automatic uzi carbine. If you are using a full auto gripstick, you do have one two options Option 1: The ATF says you need needs a small piece of metal welded in the Full Auto Grip Stick, to prevent it from the selector switch from being put in full auto mode. Now. I understand your confusion. I am using the Semi Automatic Bolt, and Receiver, and a Semi Automatic barrell, and a semi automatic sear. But since my Uzi Grip Stick is the full auto model, they still want you to permanently prevent the switch from moving to full auto. You need to do this, or you may find yourself fined and jailed. Or you can do Option 2: Buy a semi-automatic grip stick that has only two positions instead of three. See the photos below:

Semi Automatic Grip Stick. See the bar near the bottom.

Full Auto Grip Stick. No metal bar near the inside bottom
Surface prep for the receiver and pistol grip.
The McKay Receiver came unfinished and looked like this:

receiver in natural steel
And the Pistol Grip lower receiver was used and looked beat up: 
So I found some NITROCELLULOUSE GUN COATING: at D+D Sales for $14 a can. One can would do several complete uzis. Here are the specs:
- Bonds to aluminum or steel
- No baking required:
- Ready for assembly in 1 (one) hour.
- 1 hr – Very High Resistance to gasoline and oil.
- Paint Receiver, individual parts, and barrel. Thin coating allows painting inside the receiver and all other gun parts. Use single coat on internal parts or 2 light coats to allow free operation of parts. Use multiple thin coats for best results, where binding of parts is not a concern.
- Post application temperature tolerance 250 degrees.
- For optimum bonding sand blast before painting or sand and clean with course steel wool and clean with lacquer thinner before painting.
- IF SAND BLASTING IS NOT POSSIBLE: CLEAN WITH course steel wool and Acid wash with DILUTE muratic acid (HCL hydrochloric acid), (Pool acid). Dilute to 1/5; (Some bubbling will occur; remove after 15 minutes.
- CAUTION:Do not breath fumes and use Rubber Gloves. Very hazardous if inhaled and it smells pretty bad.
Here is the receiver after several light coats.  Here is the pistol grip/lower receiver with the paint still wet. I had to take all the parts off to paint it.
If your Uzi Cover is beat up, you probably want to take that apart and paint that as well. Magazine Catch, Semi Automatic Sear, Trigger and grip safety Assembly This diagram should help you assemble the rest of the internals and grip safety. 
Put the mag catch on first. The order you assemble the rest of the components have to be in this order, otherwise they don’t fit.
- Grip Safety, and spring. Attaches in the rear.
- Selector button and lever and spring. on the side of the stick
- Sear and pin. Inside the front of the receiver part.
- Trigger and pins. Near the front
- Grip and screws. On the outside of the stick.
- Now you have a completed lower receiver pistol stick.
Assemble the Uzi receiver

Both Sites, top catch, and barrel catch instructions
In the first three posts, we took a brand new semi automatic Uzi receiver and some Uzi parts from a parts kit and painted some of the parts. We also changed out the fully automatic sear for a semi automatic one, and we had a piece of mental welded into the Pistol stick grip to satisfy the ATF rules on converting a fully auto pistol grip/receiver to a semi auto one.
Putting together the Rear Site/Top cover
Before you can install the rear site, you must put the top cover latch and spring in place in the rear part of the Uzi receiver. They go right under where the rear site will be assembled.
These are the parts. Nut for the real site screw is not shown.

Parts that make up the top cover latch and rear site.
The latch I got in the parts kit and the spring are shown in the picture below. They were a little beat up, and I ended up replacing them with new parts. Also, the surface of the receiver got scratched up when I had to bend the tabs that hold the top catch in place. Since this area is covered when everything is installed, I didn’t feel I needed to touch it up.

Top cover catch and spring
Do not push the latch in all the way yet, there is a metal piece that goes over the spring and the latch and snaps on to the ends of the metal tabs. It keeps the spring and latch under press and keeps it from shooting out from the end of the gun. This is what it looks like:

This part holds the top cover latch and spring to the receiver and acts as a base for the rear site
The front is at the right. The rear as at the left. Push the catch and the spring in and this snaps over both of them on to the tabs on the receiver. The little rising area in the top of it is used to give the rear site some pressure and hold it in either of two positions.
Once this piece is in, you can put the rear site into place. There is two holes on the sides of the area where the site goes. The screw goes through one side, and through the rear site and out the other side. A special nut is then put on the bolt to hold it in place.

rear site assembled above the top cover latch assembly

The parts that make up the front site
This is three pieces. A washer, the front site , and the front site nut.
This is a hole at the top front of the receiver.Put washers, then nut, then screw in the front site. You can use your fingers to twist it in, or you can buy a uzi front site adjusting tool for fine tuning the site after the gun build is finished.
Barrel and Barrel Catch
If you look at the front of the receiver. Look to the left where the barrel goes. This is a small opening in the receiver, right above the barrel. This will hold a Spring and the Barrel Catch. This device holds the barrel in place. When installed press the Barrel Catch and then you can unscrew the barrel nut

Barrel Catch and Spring

barrel catch installed above barrel
Installing the Barrel and Nut

Since this is a semi auto receiver, you can only use semi auto barrels. This receiver has been designed that full auto barrels do not fit. This a a half moon ridge on the top of barrel and there is a similar half moon ridge on the receiver. When place together it fits perfectly. Full auto barrel would not fit. Once you have the half moons put in the correct positions the barrel snaps into the trunnion with a perfect fit. You then screw on the barrel nut. When the barrel nut is almost in place, you may have to press the barrel catch down for the last few turns. When you release the barrel catch, it firmly holds the barrel nut in place. To remove barrel, you will have to hold the barrel catch down for the first few turns as well
Top Cover alternation to Full Auto Cover

If you are using a semi auto Uzi top cover, then you need to make no alternations.
But if you are using a cover from a full auto Uzi parts kit, then you need to make one change to make it legal.
How can you tell which Uzi top oover that you own. It’s very easy. Pull the cocking handle on the top. Then let go. It should slide back when you release it. That’s semi auto.
Do you hear a ratcheting noise and when you stop pulling the cocking, level does it stop without going all the way back, well then you got the full auto top cover.
Some people suggest taking the cocking knob and corresponding assembly on the other side apart. I have a much easier way.
This is what the cocking lug looks like when it take it apart from the top cover (Don’t do it)

Under normal conditions you could just unscrew the screw in the cocking knob that goes though the top cover and attaches to this cocking lug. Unfortunately, most of these screws have been staked. They will not easily come out without drilling or ruining the screw.
Look closely at this assembly. There is a wire tab sticking out the front of the assembly. Just take some pliers grab it and pull it off. This is what it looks like:

Once this wire has been removed, the cocking level should pull back without any pressure, when you release it, it should slide all the way forward.
Here’s a diagram with an arrow pointing to the wire that should be removed.

Top Cover Wire Removal
You are finished with the Uzi top cover modification and the exterior parts on the Uzi Receive.

UZI Build Complete
Test Firing the Completed UZI and getting a proper case
 .
.
Above of pictures taken during the first firing of the finished Semi Automatic Uzi Carbine at the local gun range.
So my associate and I took the completed UZI to the local gun range and we finally got to see if it would work. The UZI takes a little while to get used to, because of the grip safety. This is the only gun I own that has a grip safety. So you have to push in the grip safety completely while you pull the trigger or nothing will happen.
I loaded the magazine, engaged the safety and the gun fired perfectly. This video below is a video of the actual first time, the gun has been fired.
This has been a fun build and it did not take much skill other than to figure out how the parts went together. I am completely happy with the build and I might even do it again and build a UZI pistol next time.
If you build yourself one from these directions, let me know if I missed anything.

Indoor Range
This is the 7th post of 7 posts about Building an Semi automatic UZI carbine. See Posts 1 to 6 on thjis site buy choosing the category. Building the UZI from the category menu.
I took the UZI shooting again today, for it’s second time at the range. It worked really fine again and I still pleased with the build.
Here’s a video of my associate firing it
Cool Case for the UZI

I have been carrying the UZI in a CMP case, above, I got from the Civilian Marksman Program for one of my M1 carbines. But then I found this great violin case:

uzi case empty

Pingback: Complete Instructions all 7 post: Building the Fully Legal Semi-Automatic UZI Carbine. | crypticpunk [krip-tik] [puhngk]
Pingback: I received the UZI violin case | crypticpunk [krip-tik] [puhngk]
Pingback: USA Today Poll on Banning weapons that Look Like Miltary Style Rifles | crypticpunk [krip-tik] [puhngk]
Pingback: Happy New Year/Year End Review | crypticpunk [krip-tik] [puhngk]
Nice write up. Thanks for all the info.
Pingback: Some punk tried to steal one of my cars last night…. | crypticpunk [krip-tik] [puhngk]
Great! Do you have a total on the cost?
Prices Change. Go to the Links section and see go to the component web sites to see what the prices are now. It was around $700 when I did it.
Great detailed article, I just recently rebuilt a abused Norinco Model 320.
Sharing! Thanks!
Very nice tutorial.
I am going to use this as I build my UZI over this year.
There are now 2 companies that sell completed receivers. The other is bwefirearms. You can get a machinegun spec semi auto, so you can use original barrels and their receivers are parkerized. BUT the catch is that they run $700. That stopped the idea of buying one of theirs. For $700 I can buy a used Vector UZI.
That cost would put a UZI build from $800 to $1300 with current prices and guesstimated shipping and transfer fees.
Building your own is not cheaper from buying a cheap Century Arms model. But I think mine is better quality then the cheap ones on the market.
Thank you for your tutorial. I used it to build my Uzi this spring.
I built a full size pistol using a BWE receiver.
I have a 10.25″ barrel and fully welded folding stock added to the back. The stock cannot be unfolded or used. This gives me the classic Uzi look without having to SBR it.
[img]http://oi66.tinypic.com/54i1s9.jpg[/img]